

Guías de Trenes en Miniatura
Graffiti Train Cars: HO & N Scale Decals and Modeling Guide
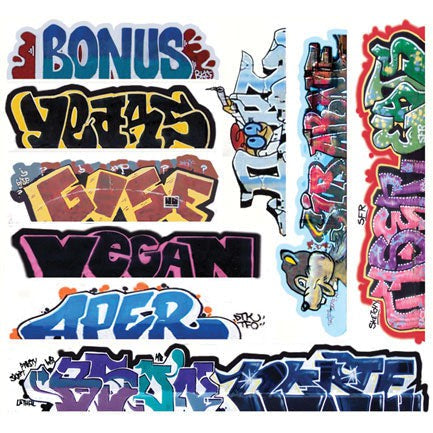
Graffiti train cars can turn an ordinary freight consist into a convincing modern railroad scene—but the best results come from more than placing a bright graphic on a car side. Scale, car type, surface preparation, placement, clear coating, and weathering all affect whether the finished model looks naturally worked into the railroad or simply stuck on top.
This hub helps you shop Muncle Mikes’ HO and N scale graffiti decals, choose the right freight car, apply the markings cleanly, and blend them into a believable finish. The featured Blair Line items are decal sets—not complete train cars—unless an individual product page specifically says otherwise.
Shop all graffiti decals → Read the modeling guide →
Start with the right scale
N scale graffiti decals
North American N scale is approximately 1:160. The smaller graphics suit compact boxcars, covered hoppers, gondolas, structures, retaining walls, and dense urban scenes without overpowering the model.
HO scale graffiti decals
HO scale is approximately 1:87.1. Its larger surfaces make trimming, positioning, layering, and weathering easier to see, which is helpful for a first detailed freight-car project.
Featured graffiti decal sets
Use several sets across a fleet to avoid repeating the same artwork on every car. Product pages show the current price and availability.

N scale · Mega Set #1
Eight modern graffiti designs for compact freight-car scenes.

N scale · Mega Set #2
Nine modern graffiti designs for varying freight cars and urban scenes.

HO scale · Mega Set #1
Eight larger-scale designs for boxcars, hoppers, gondolas, and urban scenes.

HO scale · Mega Set #13
Ten modern designs sized for HO rolling stock and trackside surfaces.
Complete N scale graffiti decal assortment
Mix large pieces, small tags, and different lettering styles so neighboring cars do not appear to come from one identical sheet.
- Mega Set #1 — 8 designs
- Mega Set #2 — 9 designs
- Mega Set #3 — 8 designs
- Mega Set #5 — 8 designs
- Mega Set #6 — 9 designs
- Mega Set #7 — 9 designs
- Mega Set #8 — 10 designs
- Mega Set #9 — 9 designs
- Mega Set #10 — 11 designs
- Mega Set #11
- Mega Set #13
- Mega Set #14
Complete HO scale graffiti decal assortment
HO offers enough surface area to layer markings, fade older pieces, and work graphics around ribs, doors, ladders, and reporting data.
- Mega Set #1 — 8 designs
- Mega Set #2 — 9 designs
- Mega Set #3 — 8 designs
- Mega Set #4 — 3 designs
- Mega Set #5 — 8 designs
- Mega Set #6 — 9 designs
- Mega Set #7 — 9 designs
- Mega Set #8 — 11 designs
- Mega Set #9 — 9 designs
- Mega Set #10 — 11 designs
- Mega Set #11 — 9 designs
- Mega Set #12 — 8 designs
- Mega Set #13 — 10 designs
- Mega Set #14 — 10 designs
How to build realistic graffiti train cars
A convincing model tells a sequence of events: the freight car entered service, picked up dirt and fading, received one or more markings, and continued working afterward. Your paint, decal, clear coat, and weathering layers should support that story.
1. Choose a freight car with the right surface
| Car type | Why it works | What to watch | Shop route |
|---|---|---|---|
| Boxcars | Large flat doors and side panels make placement simple. | Door tracks, ribs, ladders, and reporting marks. | Search boxcars |
| Covered hoppers | Common modern subject with strong grime and fade potential. | Vertical ribs can trap air or lift carrier film. | Search covered hoppers |
| Gondolas | Low sides and hard service support heavy wear. | Dents, ribs, and uneven panels need careful fitting. | Search gondolas |
| Reefers | Bright car colors create useful contrast. | Keep door hardware and safety information legible where appropriate. | Search reefers |
| Intermodal equipment | Adds variety beyond traditional boxcars and hoppers. | Corrugations and small panels limit usable decal size. | Search intermodal models |
2. Match the decal to the model—not just the label
Use HO decals on HO rolling stock and N decals on N rolling stock as the default. Before soaking or cutting anything, hold the uncut sheet next to the car. Check the height against the side panel, the width against ribs and ladders, and the relationship to doors, data panels, and safety markings. A design can be the correct nominal scale yet still be too large for a particular car panel.
| Decision | HO scale | N scale |
|---|---|---|
| Approximate ratio | 1:87.1 | 1:160 in North America |
| Best beginner advantage | More room to trim, align, and work around details. | A small amount of work changes an entire train quickly. |
| Main challenge | Large carrier film can show if the surface is rough. | Tiny graphics and stencils demand restraint and sharp tools. |
| Good first subject | Smooth-sided boxcar. | Boxcar or broad-panel covered hopper. |
3. Prepare the surface
Remove dust, fingerprints, and loose weathering with a method safe for the model’s factory finish. For water-slide decals, a smooth gloss or satin surface generally reduces trapped air and visible carrier film. Mask delicate details when necessary, use light coats, and let the finish cure completely.
Test first: paints, thinners, decal solutions, and clear coats can react differently. Follow each manufacturer’s directions and test the full layer sequence on scrap plastic or a hidden area before treating the model.
4. Trim and position with a plan
- Choose the exact panel and dry-fit the uncut design against the model.
- Trim close enough to reduce excess carrier film without cutting the printed artwork.
- Follow the package directions for soaking and release time; do not force a decal that has not released.
- Move the marking into place with a damp brush, then wick away water gently rather than dragging the design.
- Use a compatible setting solution only after testing it with the decal and factory finish.
- Let the decal dry fully before judging bubbles, edges, or silvering.
5. Work around ribs, doors, and ladders
Do not expect one large decal to bridge every raised detail perfectly. On ribbed hoppers, a cleaner result may come from selecting a narrower design, separating parts of the artwork, or making tiny relief cuts after the decal begins to settle. On sliding-door boxcars, decide whether the design belongs on the door, the fixed side panel, or crosses the door opening. Prototype logic matters: hardware interrupts paint, and a model should show the same interruption.
6. Seal, flatten the sheen, and weather in layers
Once the decal is completely dry, seal it with a compatible clear finish. Match the final sheen to the rest of the car; most working freight cars look more believable in satin or flat than in a fresh gloss. Then add weathering in thin layers: road dust near the lower sill, darker grime around doors and roof runoff, rust at scrapes and seams, and subtle fading across large panels.
Placement that looks believable
- Vary density. Put heavy coverage on a few cars, moderate coverage on others, and leave some nearly clean.
- Vary age. Fade an older piece and place a sharper, newer marking nearby instead of making every graphic equally bright.
- Respect the structure. Let ribs, doors, hardware, and repairs interrupt the artwork naturally.
- Keep some data readable. Selective overlap feels more authentic than covering every reporting mark and safety stencil without a reference.
- Connect the weathering. Dust should cross the lower edge of an older marking, while a fresh piece can sit more cleanly over faded paint.
- Avoid mirror-image fleets. Change the side, height, angle, and combination of graphics from one car to the next.
Three dependable project recipes
The first boxcar
Start with one medium or large piece on a smooth lower side panel. Add one or two small marks, seal it, and use a light dust wash along the sill. The goal is clean decal work, not maximum coverage.
The yard-veteran hopper
Fade the car first, fit several smaller graphics between ribs, then add vertical grime and lower-body dust. Finish with a few localized rust marks where the structure would collect wear.
The fresh repaint
Keep the body color comparatively clean, apply one sharp modern piece, and limit the final weathering. A newer repaint with newer graffiti adds contrast beside older, dirtier cars.
Common mistakes to avoid
- Using HO graphics on N cars and hoping the scale difference will not show.
- Applying a water-slide decal over a rough flat surface without testing.
- Touching the decal repeatedly before it has released or dried.
- Stretching one design across deep ribs, doors, ladders, and multiple panels.
- Repeating the same graphics in the same positions throughout a train.
- Making every marking equally bright, clean, and new.
- Using incompatible clear coats or weathering chemistry without a test piece.
Graffiti train cars FAQ
What are graffiti train cars?
In model railroading, graffiti train cars are freight-car models finished to represent modern rolling stock that has been tagged or painted. The effect can be factory-applied, hand-painted, or added with scale decals and then blended into the car’s weathering.
Are the products featured here complete train cars or decal sets?
The Blair Line products featured in this hub are scale-model graffiti decal sets, not complete freight cars. Pair them with a compatible HO or N scale freight car and confirm the product-page description before ordering.
Can HO scale graffiti decals be used on N scale cars?
Usually no. HO is approximately 1:87.1 while North American N scale is approximately 1:160, so HO graphics generally look oversized on N equipment. Match the decal scale to the rolling stock unless you are intentionally adapting a very small individual marking.
Which freight car is easiest for a first graffiti project?
A smooth-sided boxcar is usually the easiest starting point because it offers a broad, flat panel with fewer ribs and ladders. Covered hoppers are also excellent, but their ribs require more careful trimming and setting.
Do graffiti decals need a gloss surface?
A smooth gloss or satin surface often helps water-slide decals settle with less visible carrier film. Follow the decal and finish manufacturers’ directions, and test any clear coat on scrap or a hidden area before treating the whole model.
Should graffiti decals be sealed?
A compatible clear coat helps protect the finished work and visually ties the decal to the car. Let the decal dry fully, use light coats, and confirm that the clear finish is compatible with the factory paint, decal film, and any weathering products.
How much graffiti should go on one model freight car?
There is no fixed number. One large piece plus a few smaller marks can look more convincing than covering every open panel. Vary the amount from car to car so a train does not look like every model was decorated at the same time.
Can decals be placed over factory lettering?
They can, and prototypes often show overlap, but avoid obscuring every reporting mark and safety stencil unless a specific reference photo supports it. Selective overlap usually looks more believable and keeps the model readable.
Build a freight fleet that does not repeat itself
Choose your scale, combine several decal sets, and let the current product pages guide your final selection. For more railroad help, browse the Model Train Guides.

