

Model Train Guides
Woodland Scenics Blue Spruce Trees – 2 to 4 in – 18 Pack – TR1587
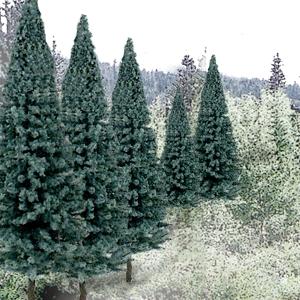
Woodland Scenics TR1587 is a pack of 18 ready-made Blue Spruce trees, each listed at approximately 2 to 4 inches tall. The manufacturer describes these as a quick way to add trees to a layout; each tree has a planting pin and an optional detachable base for temporary placement. This guide focuses on how to plan that height range, distribute a group of trees naturally, and decide when a temporary base is useful before committing to a permanent scene.
Exact pack contents and tree height
The product is identified by Woodland Scenics manufacturer item TR1587 and Muncle Mikes item number WOO1587. The current store listing says 18 Blue Spruce trees, 2 to 4 inches tall. Woodland Scenics confirms TR1587 as the 18-piece Blue Spruce pack in that same height range, given as 5.08 to 10.1 centimeters. The manufacturer lists a separate TR1588 pack with 13 trees at 4 to 6 inches, so check the final digits before ordering if the scene calls for taller trees.
The brand describes its ready-made trees as a quick way to add trees to a layout. It also notes planting pins and an optional detachable base for temporary placement. These details let a modeler test the composition before making holes or using adhesive. The listed height is a range, not a promise that all 18 trees have identical dimensions. Plan a mixed canopy using the actual sizes in the pack rather than expecting a uniform row.
Choose a scene for Blue Spruce
Blue spruce trees can help mark a forest edge, roadside, hillside, rural property line, or mountain scene. A group of 18 is enough to build a small cluster or to repeat accents across a larger layout. For the most convincing placement, avoid spacing every tree at identical intervals. Use several different heights to break the skyline, leave a few gaps for depth, and cluster trees where the scenery needs a stronger visual boundary.
Before installation, stand back from the layout and compare the tree tops with nearby buildings, vehicles, figures, and trackside structures. The 2-to-4-inch height range creates a clear scale impression, but its visual effect depends on the surrounding scene and viewing angle. A tree that looks balanced from the front may hide a building or block a train from the aisle. Use the detachable bases to move candidates until foreground, middle distance, and background read as separate layers.
For a forest, combine clusters with irregular clearings rather than making a solid wall of trees. For a residential or roadside scene, use fewer trees with space around trunks and nearby structures. This variation makes the same pack useful in several places without making every scene look identical. The goal is a believable rhythm of shapes, not simply placing all 18 pieces in a line.
Test the planting position first
The planting pin is intended to help place the tree in a layout surface. Start by marking a small group of positions with removable notes or by testing the trees with their optional bases. Check clearances for tracks, turnouts, removable buildings, wiring access, and any structure you may want to lift out later. Keep foliage away from spots that need routine access, including track-cleaning paths and hidden-reach areas.
If a pin will go into scenery, make sure the substrate is appropriate and that the planned hole will not meet track wiring or a structural support. The manufacturer’s product page offers instructions; use them for any installation steps not covered in the product listing. Do not force a pin through a hard surface. Adjust the scene or use a suitable attachment method only after verifying compatibility with the layout materials.
A temporary base helps audition placement on a tabletop or removable diorama section. It can also be useful when you want to rearrange a stand of trees as the scene develops. If a permanent position is preferred, follow the manufacturer’s instructions and check stability from more than one direction before adding surrounding shrubs or ground cover.
Maintaining variety and scale
To avoid a repeated “set” appearance, turn trees at slightly different angles and vary their spacing. Place a few at the edge of a clearing and let the rest form a loose group. Small changes in height and silhouette help create depth even when every piece belongs to the same tree type. Keep the tallest pieces behind shorter ones when the main viewing direction is fixed, but adjust the arrangement if the layout is visible from multiple sides.
TR1587 is listed as a model-making product, not a toy, and the manufacturer warns that it is not suitable for children under 14. Store unused trees where the shapes and planting pins will not be bent. Check the product instructions and age warning before use, especially when a project is being assembled in a family space.
Quick placement checklist
- Verify item TR1587, item number WOO1587, 18 trees, and the 2–4-inch height range.
- Use TR1588 only if the separately listed 4–6-inch trees are the intended size.
- Try the optional detachable bases to compare position before permanent installation.
- Vary spacing and height rather than forming a uniform row.
- Keep tracks, access points, and removable structures clear; follow the included instructions.
See the exact Woodland Scenics TR1587 product page and browse other layout ideas in the Muncle Mikes model train guides.

