

Collector Guides
Model Train Couplers Explained: Compatibility, Height and Upgrades
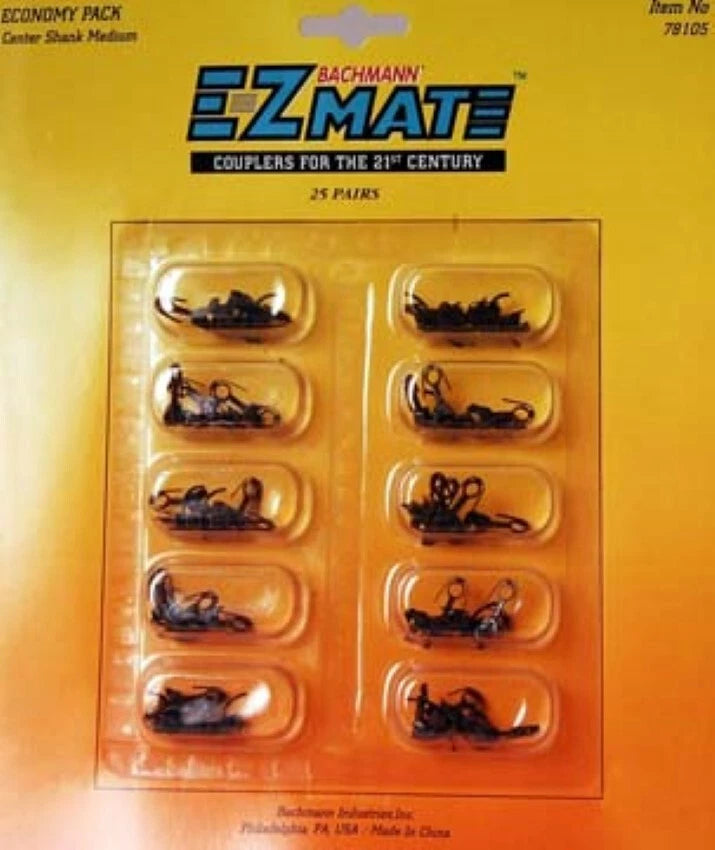
When two cars will not stay coupled, start with the connection itself: the head design, its height and the way it moves in the mounting box. Buying another pack of couplers before checking those three things can leave the original problem in place.
This guide works through North American HO knuckle-coupler checks, using a Bachmann replacement pack and Kadee measuring tools as exact examples. The HO height reference below is not a specification for N, O or other scales. Use the instructions and gauge intended for your equipment.
A matching head is only one part of compatibility
Look underneath the car before choosing a replacement. Record the model’s maker and item number, whether the coupler is attached to the body or the truck, and how its shank is retained. The draft-gear box is the pocket that holds the shank and allows it to swing. A coupler that connects to the next car can still be the wrong fit for that pocket.
Start a Kadee conversion with the manufacturer’s HO conversion listings, then follow the instructions for the particular model. Kadee cautions that its recommendations are a starting point based on a sample model; production variations can require a different part or modification. A familiar brand name is not a fitment guarantee.
Shank length and vertical offset are separate choices. Kadee’s coupler reference charts distinguish centerset, underset and overset shanks: an underset shank raises the head relative to the shank, while an overset shank lowers it. Choose the offset from a measured height problem, not from which part looks most like the old one.
What the Bachmann 78105 pack establishes
The Bachmann 78105 E-Z Mate economy pack contains 25 pairs of HO center-shank medium couplers. Bachmann identifies them as magnetically operated knuckle couplers. This is the original E-Z Mate listing, not an E-Z Mate Mark II pack.
Those details identify what is in the package. They do not establish that it drops into every HO car, replaces every horn-hook fitting, or provides the correct head height on your model. Check the pocket, retention method, shank clearance and instructions before choosing a fleet-sized pack.
Compare the centers of the knuckles, not their top edges
Kadee’s #205 and #206 gauge instructions specify an HO coupler centerline of 25/64 inch above the top of the rail, approximately 9.92 mm. Measure to the center of the knuckle. Different head sizes make their top or bottom edges an unreliable reference.
Assemble the gauge as directed and use it on a straight, level section of track. Roll each end of the car up to it and compare the centerlines. Check whether the car’s coupler is level or drooping as well as whether it is high or low. Write down the result for each end; correcting one end does not establish that the other matches.
The metal Kadee #205 is not insulated. Use it only on unpowered track or with track power completely switched off. The #205 metal gauge kit includes No. 5 and #58 reference couplers. Its job is measurement, rather than supplying a fleet of replacement couplers. Kadee’s official #205 specification confirms the power restriction and that track is not included.
The #206 is the insulated alternative. Kadee supplies it as a kit with #148 and #158 couplers; the product photograph shows an assembled gauge. Track is not included. Its manufacturer specification lists coupler, trip-pin, uncoupler and body-mounting-height checks, plus an HO track gauge.

Correct the mounting before adjusting the trip pin
If the coupler is low, first find out whether the head is drooping or the mounting position itself is low. Kadee’s mounting guidance calls for level couplers, controlled vertical play and a lid that does not flex downward. It also says to check mounting and head height before adjusting a trip pin that catches on trackwork.
Do not treat truck washers, box shims and offset couplers as interchangeable cures. They change different parts of the installation. Follow the model’s conversion instructions, make one change and recheck the height. Avoid cutting or filing a mounting surface just to make an unverified replacement fit.
Move the coupler gently from side to side and check that it returns toward the center. Confirm that the knuckle opens and closes. A correct height reading does not excuse a binding shank, loose cover or damaged spring. Resolve the fault before using a train to pull against it.
Prove one car on your route before converting the rest
With the coupler installed and checked, hand-roll the car with its intended neighboring car through the tightest curve and turnout on the route. Watch the coupler swing and the clearance between car ends, steps and trip pins. Kadee’s HO conversion advice specifically recommends this check with the longest cars: a shank that reaches the side of its box can run out of swing and lift a truck.
A body-mounted coupler follows the car body; a truck-mounted coupler turns with the truck. Changing that arrangement changes the geometry you need to check. Do not assume a body-mount conversion will retain the original minimum curve capability. Our HO 18- versus 22-inch curve guide explains why the actual equipment and route matter.
For older horn-hook stock, a transition car can keep two groups connected while you convert gradually: one end retains the old system and the other uses the new one. Kadee describes this approach in its Kadee horn-hook conversion advice. Each end still needs its own correct installation; a transition car does not make unlike coupler heads directly compatible.
Once the hand-rolled check passes, try a short train slowly in both directions and include the switching moves you intend to use. If separation always occurs at one location, inspect that location as well as the car. Keep a brief record of the part fitted and the adjustment made so the next conversion starts from evidence.
Start with a fixed height reference
If you need an HO measuring tool, check the Kadee #206 insulated gauge kit and its included parts before choosing replacement couplers. Establishing the height gives you a useful starting point for the repair.
For other repair items, browse model train parts and accessories with the model number and measurements beside you. Choose the required fitting first, then check its movement on the actual layout.

