
Hot Wheels Gassers
How to Build a Custom Hot Wheels Gasser
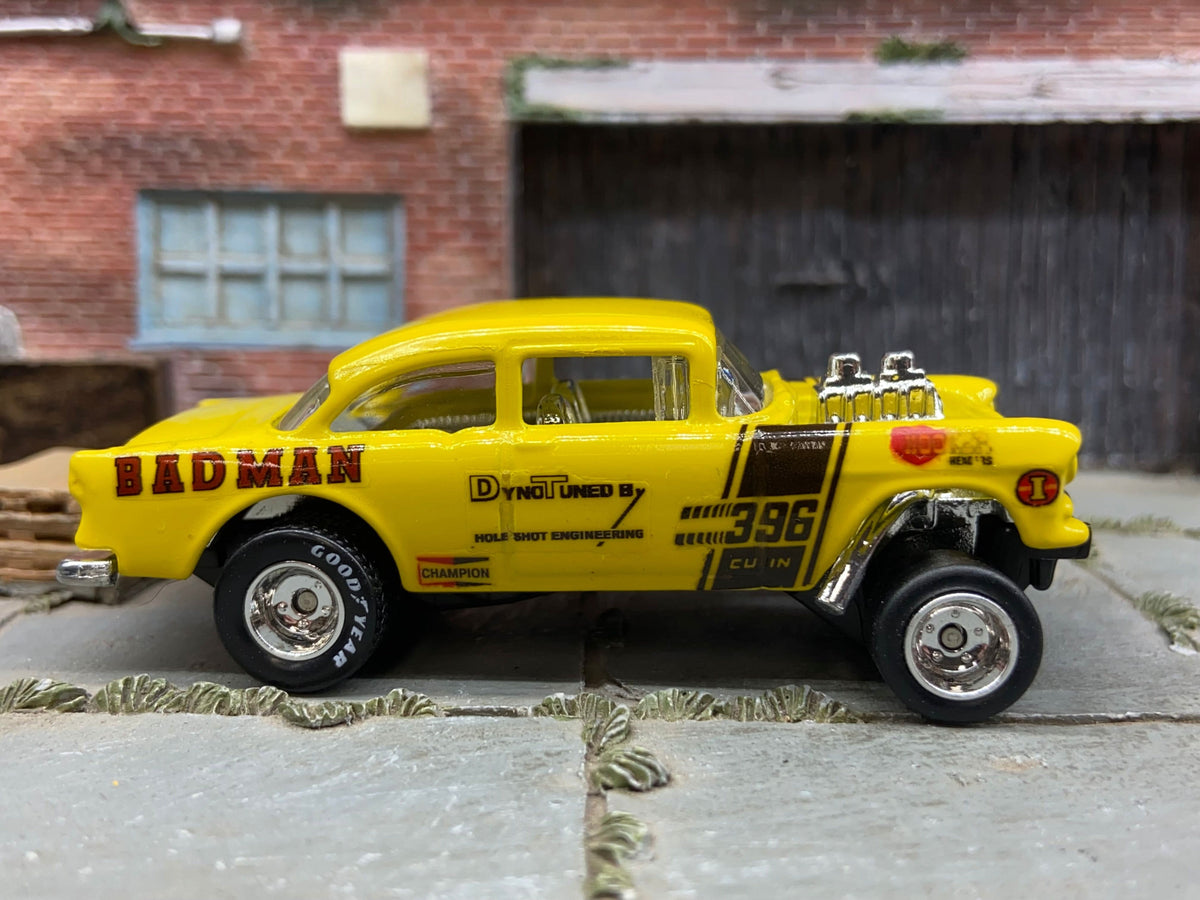
Featured build: Muncle Mikes yellow BADMAN ’55 Chevy Gasser. It is a finished custom, not the contents of a DIY kit.
Build the stance before you paint. A convincing custom Hot Wheels gasser starts with the right casting, a square axle setup and tires that clear the body—not simply the biggest rear wheels you can find.
Choose a prepared gasser kit, test-fit the wheels and body, finish any mechanical work, then paint, decal and reassemble. Opening a factory-assembled car is a separate route; a ready-to-paint kit may already have that work done.
Choose a Hot Wheels gasser kit for your first build
A prepared kit lets you concentrate on fit, finish and assembly rather than starting with paint removal and factory-post drilling. These are two different Chevy gasser projects—not interchangeable bodies or a universal parts package.

1955 Chevy Gasser DIY kit
Start with the familiar open-engine Chevy gasser shape. The listing describes a stripped, ready-to-paint project; check its components before choosing upgrades.
Choose the ’55 Chevy kit
1964 Chevy II Nova Gasser wagon kit
Prefer a wagon? This is a separate casting and a separate fitment job. Measure its wheel openings and axle space rather than copying a Chevy sedan setup.
Choose the Nova wagon kitPlan upgrades separately. Custom wheels and decals are add-ons unless the individual listing expressly includes them. Check the supplied base, interior, windows, wheels, axles and closure method; do not assume tools, paint, screws or replacement axles come with a kit. Browse all Build Your Own Hot Wheels kits for other castings.
Tools and supplies to put on the bench
For a prepared paint-and-wheel build: a metric ruler or calipers, parts tray, tweezers, suitable small hand tools, a flat test surface, compatible paint supplies and the chosen wheel-retention system. Add a padded vise, a controllable drill with appropriate metal-cutting bits, and matched hardware only when the assembly actually requires drilling.
Workshop safety: clamp the work securely; never hold a tiny casting in your fingers while drilling. Wear eye protection, keep hair and loose clothing clear, and disconnect power before changing bits. Follow the tool manual and coating labels for ventilation and protection. Drilling, cutting and chemical work should be handled by an appropriately equipped adult. See Dremel’s safety guidance.
1. Measure the front and rear before changing anything
Photograph the side profile, underside and part arrangement. Identify an existing factory release before permanently altering it; a collectible example may be better preserved. Keep the original pieces labeled so you have a reference if the replacement setup binds.
| Record separately | What to measure | What it prevents |
|---|---|---|
| Front and rear tire size | Outside diameter across the tire and total tire width, not just rim diameter. | A visually correct wheel that rubs the arch. |
| Axle and hub fit | Axle diameter, hub bore and usable wheel-to-wheel spacing. Check whether a seller quotes overall or usable axle length. | Binding hubs, wobble and mismatched axle sets. |
| Side clearance | Space to both inner and outer body surfaces, with the complete body and interior fitted. | A wheel that spins only with the body removed. |
| Ride height | Front and rear reference points on the body, measured above the same flat surface. | An accidental change in rake or a car leaning to one side. |
| Assembly clearance | Axle-channel space, interior clearance and available post depth for the chosen closure. | Pinched axles or a screw driven too far. |
The linked ’55 Chevy and Nova kit listings give a general 10–12 mm wheel-size note. Treat it as a starting reference, not proof that every wheel in that range fits. It does not specify every front/rear diameter, width, offset or axle combination. Measure your actual parts before ordering from the wheel and tire collection.
2. Drill factory posts only when the build needs it
A prepared kit and a factory-assembled car are not the same starting point. Check how your kit opens and closes before reaching for a drill. On a factory assembly, removing the spread-over post head and drilling a hole for a screw are two different operations.
- Inspect and secure. Confirm the assembly uses riveted posts rather than existing screws or clips. Support the casting in a padded fixture without crushing its body or glazing.
- Work on the head, not through the body. Select a suitable metal-cutting bit for the visible head and surrounding clearance. Keep it square to the post, remove material in controlled increments and inspect frequently.
- Stop when the head releases. Do not drill deeper merely because the base resists. Check remaining metal and any tabs; avoid levering hard against the axle or a thin plastic edge.
- Plan screw holes separately. A threaded closure needs a pilot size matched to the selected screw or tap, plus a measured depth limit. Never drill blindly toward the roof, hood or interior.
A hands-on reference for the head-removal approach is My Custom Hot Wheels’ base-removal walkthrough. Its example bit is not a universal specification for every casting. There is no single “use 1/16 inch for everything” instruction here.
3. Set the gasser stance with a complete dry fit
The ’55 Chevy Gasser already supplies a gasser-style profile. Start by preserving its intended geometry; do not automatically lower the rear or lift the front further. Put the body, base, interior and proposed wheels together temporarily, then view the car at axle height from both sides.
Check four tire contact points first. A nose-high profile can still sit square. Correct an axle that is crooked or a wheel that is not fully seated before changing mounts. If you alter an axle carrier, keep it rigid, centered and square to the body; loose spacers and deliberately bent axles are not a dependable stance adjustment.
Diameter is not ride height. With the axle mounting unchanged, moving from a 10 mm to a 12 mm tire raises that axle by about 1 mm because the radius increases by 1 mm. That geometry example is not a tested fit recommendation. The larger tire also needs more wheel-arch clearance.
For a drag-style appearance, compare narrower front tires with fuller rear tires while retaining free movement. Mattel’s TRIASSIC-FIVE ’55 Chevy Gasser illustrates separate front slotted and rear drag-slick wheel choices; it is a styling reference, not an aftermarket compatibility chart. Read more about gasser stance and the nose-high profile.
4. Fit the wheels and axles before painting
Select wheel diameter, width and axle fit together. A part labeled “1:64” is not automatically compatible with every Hot Wheels casting. Choose a wheel set with a clearly described attachment method; prepared axles, cut-to-length systems and separate wheel-and-axle parts are different jobs.
With access to the base, release reusable retainers carefully where the design permits. Do not force a plastic clip or treat a metal retainer as if it flexes the same way. Test the new assembly before permanently securing it. Keep adhesive out of wheel bores and running surfaces; a sleeve used as a stationary support must still allow the intended moving parts to move.
Spin each wheel, then roll the complete dry-fitted car forward and backward. Check tire-to-body clearance with the wheels shifted gently to each side. If it rolls only when the body is lifted, diagnose the interference instead of forcing the base closed. Rubber tires are a visual and material choice—not a guarantee of better track speed.
Watch the ’55 Chevy Gasser wheel-swap demonstration
From our existing 1955 Chevy Gasser wheel-swap article. Use the written measurements and your parts’ instructions alongside the demonstration.
Compare Hot Wheels wheels and rubber tires, then consult the gasser wheel-and-tire setup reference. Check axle inclusion and dimensions on the actual listing before ordering.
5. Prepare, paint and decal the body
Finish cutting, drilling and fit corrections before applying your final finish. Take the assembly apart again and keep windows, interior, wheels and tires away from stripping chemicals and overspray. A stripped, ready-to-paint kit does not need another stripping cycle simply because a generic tutorial says so.
Clean metal, compatible primer, controlled color coats
Remove residue and surface contamination using a method approved for the material and coating system. If paint removal is needed, follow the remover’s substrate, handling and cleanup instructions; never assume a citrus label makes a product safe for plastic. Avoid household ovens or improvised heat-curing.
Choose a primer intended for the substrate and compatible with your color coat. For example, Tamiya’s Surface Primer specification explicitly includes metal parts. Test the full primer, color and clear combination on scrap first. Apply controlled light coats without burying panel lines, and follow each product’s recoat and full-cure instructions rather than an invented universal drying time.
Decals and final sheen
Plan race numbers and graphics around the doors, rear quarters and exposed engine. Trim and apply 1:64 waterslide decals according to their instructions. A suitable smooth gloss surface can help decal film lie cleanly; let the decals dry, then test a compatible clear coat before sealing. A satin or matte finish can be the final layer when the coating system permits it. Testors’ model-car finishing example covers layered color, cure times and decal preparation.
6. Reassemble and check the finished gasser
Use the closure specified for your kit or the hardware you planned before drilling. A screw must engage securely without bottoming out or distorting the base. Use adhesives only where suitable for the actual materials, keeping them away from glazing and moving parts. Do not force a freshly painted assembly together.
After the finish and adhesive have cured, inspect the car from the front, rear and both sides. Confirm four-point tire contact, clear wheel travel and a base that sits correctly. Repeat the roll test after fastening; a car that rolled during the dry fit can bind once tightened.
Record the work: keep the casting name, front/rear wheel dimensions, axle arrangement, paint products and closure method with your build photos. When selling or displaying it, identify repaints and wheel swaps as custom work—not a factory variation or Super Treasure Hunt.
Gasser build troubleshooting
| Problem | Check first | Better next step |
|---|---|---|
| Rolls open, binds closed | Interior contact, trapped axle or body rubbing the tire. | Reopen and locate the contact point; correct fit before fastening again. |
| One tire sits off the surface | Axle straightness, wheel seating and mount alignment. | Correct alignment instead of bending another axle to compensate. |
| Rear slicks rub | Outside diameter, width, offset and side play. | Try a compatible narrower or smaller assembly before modifying the body. |
| Wheels wobble or pull sideways | Hub-to-axle fit, damaged parts and uneven retention. | Replace mismatched parts; do not glue a rotating hub solid. |
| Paint wrinkles or lifts | Surface preparation, layer compatibility and recoat timing. | Stop adding coats; follow the coating maker’s repair instructions and retest on scrap. |
| Base will not seat | Part order, paint buildup and screw length. | Identify the obstruction; do not use screw pressure to pull it together. |
Prefer a finished custom Hot Wheels gasser?
Compare complete builds when you want the display car without the bench work. These are separate product examples, not a claimed before-and-after of either kit shown above.

Yellow BADMAN ’55 Chevy Gasser
A finished custom-painted example with drag slicks. Compare the full photo set for paint, graphics and proportions; this is a completed car, not a DIY kit.
View the BADMAN custom
Blue ’55 Chevy with black 5-spoke wheels
Another finished-build option with a different wheel style. Read the individual listing for modifications, condition, included items and current availability.
View the blue Chevy customProduct pages show current prices and availability. Browse the full custom Hot Wheels gasser collection or explore other finished custom Hot Wheels. Look for the actual modifications and included items rather than assuming every build has identical paintwork or rolling performance.
Custom Hot Wheels gasser FAQs
What is a sensible first gasser project?
A prepared ’55 Chevy Gasser kit is a straightforward place to focus on paint, wheel fit and assembly. Keep the intended axle geometry for the first build instead of combining a repaint with a scratch-built chassis.
Do I need to drill a Muncle Mikes DIY kit?
Not automatically. The linked gasser kits are described as stripped, ready-to-paint projects. Check their current assembly instructions and condition before doing additional drilling.
What size drill bit should I use?
Choose head-removal tooling for the actual post and available clearance. A separate screw pilot must match the chosen hardware or tap and measured depth. Do not substitute one fixed diameter for both operations.
Will any 10–12 mm wheels fit a ’55 Chevy Gasser?
No fit is established by diameter alone. Check tire width, hub bore, axle spacing, offset and clearance with the complete car assembled. The listing’s size note is not an aftermarket fit guarantee.
Does a gasser need an exaggerated front lift?
No. Start with the casting’s existing stance. Keep the axles square and all four tires on a flat surface, then make only the changes your planned build requires.
Are custom wheels, axles and paint included in every kit?
No universal bundle is implied. Read the individual parts list. Custom wheels and decals are separate upgrades unless expressly included; check tools, paint, axles and hardware separately.
Should I paint before doing the wheel swap?
Do the mechanical work and complete dry fit first. Then remove the body for finishing, let the coating system cure and perform final assembly and roll checks.
Will rubber tires make the car race faster?
Do not assume so. Wheel fit, axle alignment, rubbing and the intended track all matter. Choose rubber tires for the build you want and test actual performance separately.
Start with the casting. Finish with the details.
Choose a prepared project, measure for the right wheels and plan the finish before ordering the extras.
